This Antenna Mast System Really Works! Wow! Look at Figure 1.
Most Common Telescopic Antenna Masts Can Use This Fix.
NOTE: The information provided herein on this enhanced Telescopic Mast and its modified Winch-It-Up Mast Support are completely independent from the information provided in www.ke1q.com links on the 1-1/2″ EMT and 1.9″ OD Fence Rail masts though there are many similarities between them.
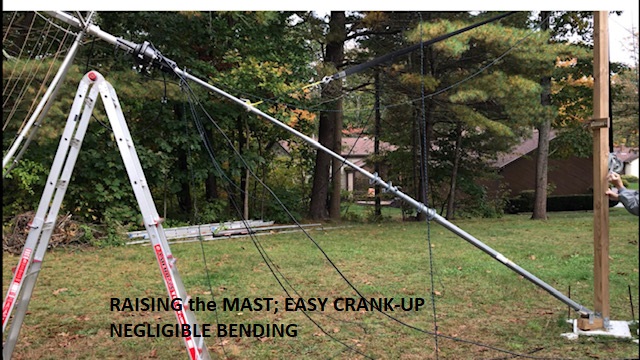
PURPOSE: It is to describe a better way to raise your telescopic mast-starting from building a Winch-It-Up Mast Support to the adding of strength/rigidity to the mast. The result is that you can place a hex antenna (mine’s a K4KIO Leo, about 25#) and a 10# rotator, if desired, at the top. AND you can do this project mostly by yourself. You will need an extra person on raising day. This is not baloney as I am over 80 and just completed this project successfully. There is NO manual hand-raising the mast when using this system-the winch does the heavy lifting for you. See Figure 1, 2. ARE YOU INTERESTED???

As you know there are two basic versions of the common telescopic mast-one that has an 8′ top section (like Rohn 9H50) and one that has a 10′ top section. I purchased the 8′ top Rohn 9H50 for my use. The difference, besides some height, is that the 8′ top type is UPS shippable while the 10′ top has to go by LTL truck at a much higher cost. In this article, I will address the 8′ top mast as it is probably the most common now and the instructions are fewer and easier to perform.
Here’s a quick overview of how I got it done.
1. I purchased a Rohn 9H50 telescopic which has the 8′ top section.
2. I manufactured 5″ Reinforcers from close tolerance DOM steel to fit and reinforce the top section. You need three of them for the 8 foot top. They slide comfortably over the top section-comfortable, but not sloppy. See Figure 3.
I believe these Reinforcers are the reason my mast was initially raised from the ground up with only slight, but not permanent, bending during the process.
3. I built a diy KE1Q Winch-It-Up Mast Support that was modified to raise a telescopic mast with 8′ sections instead of the 5 foot sections of my previous design. You’ll get a good two feet of stroke before you have to reset the strap’s clamp. My mast support was made from a 4x4x12′ Pressure Treated beam. See Figure 4.


4. I built a simple swivel base for the mast support. See details later on. See Figure 5.
5. Guys and guy levels. I used the standard Rohn guy rings, but at the top, I added a 1″ Guy Ring Retainer to securely hold the top guy ring in the correct position. For my top guy level, I used a 4 guy rope setup. On lower levels, I used the 3 guy rope setup.
6. Multi-Purpose Ladder (MPL). I used two of them, though one can get you by. One has to allow you to safely reach around 12-13 feet in height. You need to reach this height just once to release a clamp after the initial vertical raise operaton and to safely work with at the top standoff bracket. For the Stand-Alone/Portable options, you need an MPL with at least 8 steps (16 feet as an extension ladder) for ladder safety.
Note: therefore, your MPL must have 8 steps as safety instructions require you to have two steps above the highest one you need to complete the job. My calculations for the average man’s height, 5′ 9″, to safely perform the necessary functions requires 6 MPL steps. See Fig. 6.
A regular 7 step MPL works for the Wall Mount option. See Figure 6.

Parts Required for 8′ top type:
3-Reinforcers. They are 5″ long with an OD of 1.500″ and made from close tolerance DOM steel. The Reinforcers slide onto the 1-1/4″ OD top section from the top. They are used only on the top 1-1/4″ OD section. See Figure 3 and Figure 7.
1-6″ Adapter Reinforcer (AR). If you’re using a Yaesu G450-A rotator at the top, you need this larger OD piece added to the end to be clampable to the rotator’s lower mast clamp. It’s drilled to accommodate the G-450A throughbolt. If not using a top rotator, it reinforces the mast’s top as it fits into the antenna’s base mount. See Figure 3.
1-1″ Guy Ring Retainer (GRR). This is needed for the top factory guy ring to be placed correctly. See Figure 3.
1-Swivel Base. I used a swivel base of my design. It keeps the mast in place when raising or lowering. It is described later on. See Figure 5.
-Guy Rope. This is your insurance policy-the better it is, the safer your installation. Overdo the guys-it will pay dividends. I don’t recommend the 3 guy system with a small beam antenna on top. And at a height of 30′ or more a 4 guy system is the better way to go. I use Mastrant-P 5mm, 1102#, and STI brand 3/16” double braided black polyester support rope, 770#, available from many suppliers.
-Guy Rope Tensioners. I use the Cam-Jam XT and the 3-ball type available as Buckmaster Line-Grip™ or clothesline tightener equivalent. The XT is rated for a much higher load, but I’ve never had a failure from the 3 ball type during the past 12 years of use. See Figure 9. If you’re good with knots, you can save a lot of dollars here.


MISC hardware. Described within.
You’ll need some basic DIY skills and tools-most of which you probably already have. Some of the parts can be ordered from this website or other online suppliers. The rest are from local lumber, big box and hardware suppliers. Note: you will need at least one multi-purpose ladder. Also, you need muffler clamps (1-3/8″,1-1/2″, 1-3/4″, 2″) for the various telescopic diameters. Also, a number of 5/16″ lag bolts. Note on lag bolts: They should be long enough to allow at least a one inch penetration into the 4×4. So for wood-wood I use 5/16 x 1-3/4 or 2″ lags and metal-wood I use 1-1/4″ lags except I use 5/16 x 1-1/2″ lags on the winch. These lengths are just a guide to go by.
Don’t forget a pair of 4″ Standoff Brackets, the type with the front strap that is capable of holding a 2-1/2″ mast.
The first step before starting is to make sure you can set it up in a spot that can accommodate the mast in the laying position ( to about 20′ out from the base) and in a line that can line up with the direction of the mast support’s swivel base. There should be no interference while raising/lowering the mast with antenna.
Again, before starting this project, you should familiarize yourself with your telescopic mast, especially if newly purchased. So, extend your mast out completely so you know where the guy rings, clamps and cotter pins go. I magic marked a circle around each bottom section after it was fully extended, AND I made vertical lines, about 2″, up from the two cutouts so later on I can more easily locate the cutouts after raising that section of mast. This makes it easier knowing when a section is fully extended and you can secure it from moving.
There are 8 parts to the process. They are:
Part 1. Adding strength/rigidity to the top section.
Part 2. Instructions to build my 4×4 pressure treated (PT) strap winch-it-up mast support.
Part 3. Adding an inexpensive swivel base.
Part 4. Preparing the Mast Support & Mast for Initial Raising
Part 5. Other Pre-raising Preparation.
Part 6. Actually raising the mast/antenna to vertical.