Antenna Mast & Mast Support Notes
NOTES ON: Guy Ring Retainer (GRR), Guy System, Standoff Brackets, Swivel Base, Winch Setup, Raising the Mast, Down Mast
TOP GUY RING RETAINER (GRR) (See Figure 1): If you are erecting this mast for use as a center support for wire antennas, you will probably locate your top guy ring retainer a foot or so under the very top of the mast, so the guys won’t interfere with a balun or other centerpiece. However, if you are placing a rotator and/or beam at the top of the mast, consider the following thoughts.
The area directly under the rotator is going to be the weakest link on most masts, generally, because there is no guy support above this spot. Thus, the wind loading bending effect will be maximized here. To virtually eliminate any unsupported pipe exposure here, mount your GRR an inch below the lower rotator clamp or the beam itself, if no rotator is placed here. This leaves enough clearance for the guy ring to move freely with the guy ropes installed. So with negligible clearance allowed around the guy ring, it will be much more difficult for the pipe to bend here.

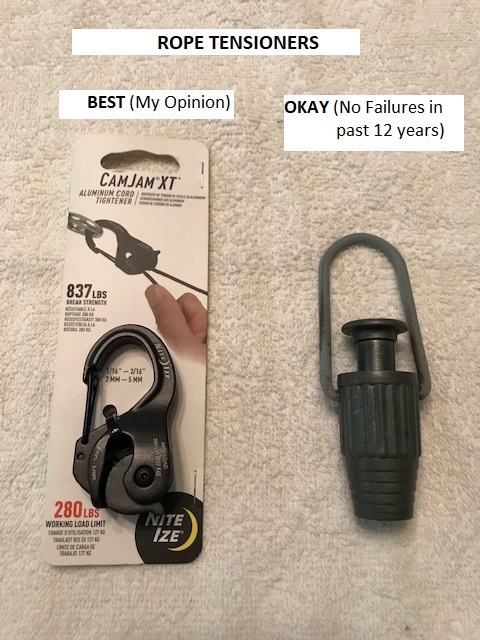
GUY SYSTEM: This is your insurance policy – the better it is, the safer your installation. Overdo the guys – it will pay dividends. I don’t recommend the 3 guy system with a small beam antenna on top. And at a height of 30′ or more a 4 guy system is the better way to go. I use Mastrant-P 5mm, 1102#, and STI brand 3/16” double braided black polyester support rope, 770#, available from many suppliers. For rope anchor grips, I use the CAM-JAM XT and the 3-ball type available as Buckmaster Line-Grip™ or clothesline tightener equivalent. The XT is rated for a much higher load, but I’ve never had a failure from the 3-ball type during the past 12 years of use. If you’re good with knots, you can save many dollars using just the ropes. See Figure 2.
STANDOFF BRACKETS (Wall Mounts): When using the Winch-It-Up Mast Support or a straight 12′ pressure treated beam, you will need a 4” set of standoff brackets for most installations. These are available from many online sellers.

Make sure your purchase can accommodate a 2-1/2” diameter mast and my advice is to stay away from the U-bolt type as they are more difficult to work with in our setup. When passing the guy rings through these brackets, it will be necessary to remove the strap to pass the guy ring. Before removing the front strap, tighten-up the installed rope guys to not-quite-tight; leave a little play in them. This way you can remove the top bracket’s strap and pull the mast out enough to pass the guy ring while not worrying about the antenna/rotator (or other antenna) from leaning the mast out of control. After passing, replace the front strap to its former loose adjustment.
If you have difficulty passing the guy ring through the lower standoff bracket for lack of enough free play, raise the mast off the ground with the winch. This will give you a bit more movement in the mast. If not using a winch, you will need an extra person to hold the mast off the ground.
NOTE: See Figure 3 for Modified Standoff Brackets
To make it easier to pass Couplers and Reinforcers through the standoffs, I have ground the inside edges (both top and bottom) of both pieces to about a 45 +/- degrees so it is quite thin. Grind only the area in between the holes. (Thanks, Ray, K1EJA). This will help both in raising and lowering the mast. You need to have a powered grinder if you decide to perform this operation. Definitely wear Safety Glasses.
NOTE: To assist in making it easier for Couplers/Reinforcers to pass through the standoffs, place a compression spring on each standoff bolt. (Thanks, Mike, K1FNX). Compression springs need only a little tension to work. Match the spring’s ID to the diameter of the standoff bolts used. They should be between 1-2″ long. See Figure 3.
CAUTION: Standoffs are not designed to support the weight of the mast when it is off the ground. They simply hold the mast in place to a vertical support or a wall. The strap winch in the winch-it-up mast support acts as the support for the mast and can be operated by oneself.

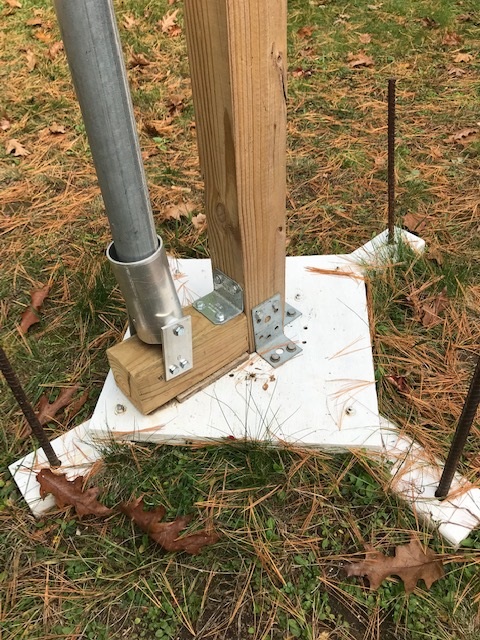
SWIVEL BASE: See Figures 4 & 5. This cylindrical swivel allows you to keep you mast’s base in place while raising/lowering. It consists of a 2-7/8″ OD metal cylinder attached to a 8″ piece of 4×4 placed at the mast’s base. A right angle metal bracket connects the 8″ piece to the main 4×4. Lowe’s has a good one made by Simpson Strong-Tie, 2x2x3. It comes with 1/4″ holes. I drilled the 1/4″ holes out to 5/16″ and mounted with 5/16″ lag bolts. The Swivel Kit comes with pre-drilled metal 2×4″ straps and all hardware.
Step 1: I attached the 8″ piece of 4×4 at the base after the mast was standing at its location. It mounts/lays lengthwise and is perpendicular to the main 4×4 support. I used the right angle bracket here with lag bolts. The 8″ piece can be laying directly on the ground, but you might want more scrap material under it for more protection/rigidity. You have flexibility here as long as the swivel and its base are secure. See Figure 5.
Step 2: Aligning the Swivel for a vertically square mast. Have a level handy in your pocket. With around 10 feet or so of mast laying on the ground without antenna and G-450A (if used) attached, hand raise the mast vertically so you can loosely connect it to the lower standoff. While holding it against the lower standoff, with your other hand place the mast’s base on the 8″ 4×4, adjust it so it is vertically square and tighten the lower standoff. Take your magic marker and mark on the 8″ piece with a circle where the mast sits on it. Now you will be as close to vertical as is reasonably possible. The top section plays no part in this alignment. Note: if you have a straight metal pipe that’s easier to use than the mast, for operation, use it.
Step 3: Placing your Swivel on its 8″ base. See Figure 5. Your swivel has two pre-drilled 4″x2″ straps. Attach the single hole end of the two straps to the cylinder with the provided spacers or washers equally divided between the outer cylinder walls and the straps and then tighten using the 4-1/2″ bolt and nut. Don’t mix up the 4×2 straps. They’re marked A and B. Keep them in the same position all the time as they may not be exact copies of each other. Line up the brackets so the 2-7/8″ cylinder is centered on the circle you marked earlier. Mark and Drill two holes in the sides of the 4x4x8″ and attach with 5/16×1-1/2″ lag bolts. Make sure you have allowed an inch plus clearance from the bottom of the cylinder (when upright) to the top of the 8″ 4×4. I used a 7/32″ drill bit for 5/16″ lag bolt holes though a 3/16″ bit will work fine. Tighten the 4-1/2″ bolt so it has some resistance so you can change the cylinder’s angle as needed, but it stays in place.

WINCH SETUP: (See Figure 6) I have a strap winch on my Winch-It-Up Mast Support. It makes raising and lowering of the mast much easier, safer and certainly more controlled. Mine is a strap type purchased at a local discounter for about $35 and is rated for 1,500 pounds. Note that the winch is at the top of its travel — ready to attach the next 5 footer. Notice also the orientation of the standoffs and mast. As you face the building, they are facing to the left. This allows the winch to be installed and to function properly.
Note on winch install: if the lower mounting lag bolt is hard to get to due to the strap being in the way, unwinding the strap will expose the hidden bolt hole.
WINCH WARNING: Before using the winch in the vertical position to raise and lower the mast, make sure it is in the locked position before leaving it unattended. Be very careful with the winch’s locking device. There can be quite a bit of weight supported by it. Remember, you’re raising straight up vertically-not pulling horizontally. Get used to it before using it. If it seems to be hard to crank up, you probably have something hanging up somewhere above, ie, a coupler caught on a wall bracket, guys or a coax cable that are too tight.
RAISING THE MAST: My mast currently is over 50′ high with excellent results. It has been over 50′ high for several years with no mast failures. One person raising the mast is not the most efficient way to get it up, but it can be done. After reaching about the 25 foot level with a small beam and rotator on top and working by oneself, a lean can be expected. If by yourself, you will spend much time chasing around to the guy points making adjustments after every foot or so of new lift. If you have a few helpers and have your 5 footers and guys ready, the whole process can be reduced to an hour or so rather than many hours if by yourself.
DOWN MAST: Now that you have the mast up, you need to develop an easy procedure for bringing it down as in a threat of high or hurricane winds.
You’ll need a ladder to loosen the standoff brackets so the mast couplers’ pan head bolts and guy rings can pass through the brackets. You’ll need to watch the mast for tilting on its’ way down. If it tilts due to component imbalance, winds, etc., then let it down in smaller than 5 foot steps, say 1-2 feet. Then tighten the control guys and proceed again.
The installed guy rings won’t pass the loosened standoff brackets. You will have to remove the top bracket strap to wiggle the guy ring past. Use the same procedure you used when passing the guy rings through the top standoff during the mast raising procedure. Securing the guys is most important. On the lower standoff, you can easily remove the bracket strap to pass the guy ring. If you can’t wiggle the pipe enough to pass the guy ring, winch up the mast so the lowest section is just off the ground. This will give you extra wiggle room.
If a coupler hangs up and you don’t have the extra person to hold it centered while it clears the bracket, first release the pressure on the bracket with the winch, then loosen the bracket strap some more, if possible, and then wiggle the mast past the hang-up. A helper solves this issue very easily.
As I take out the 5 foot sections, I remove the top bolt in the coupler. That way it’s ready to be re-installed later.
I drop mine to a convenient spot and the hex has less exposure to the wind. I then secure the wall brackets and remove the ladder to safety.
DONE-GOOD LUCK!!